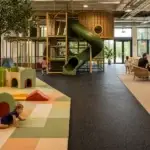
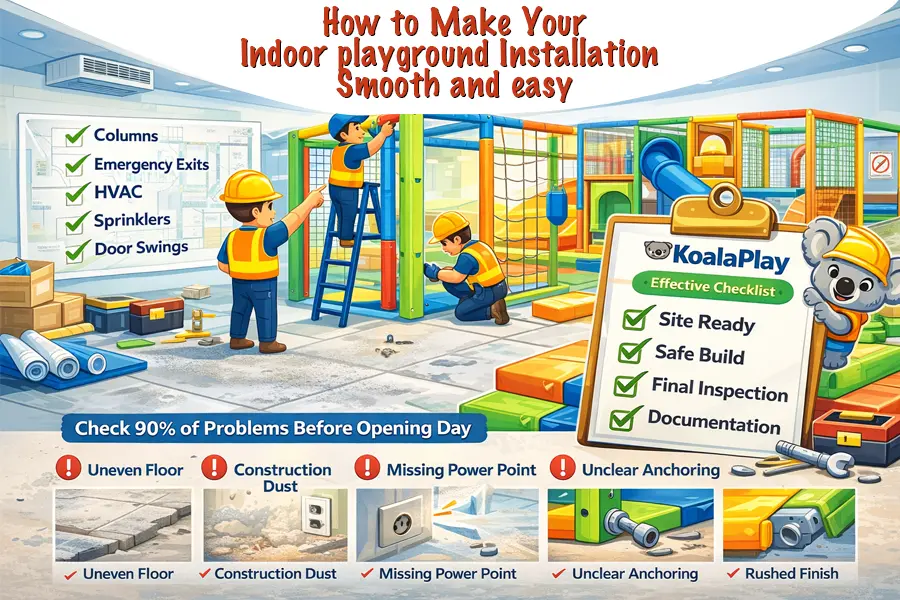
Indoor playground installation checklist items matter more than most owners expect. The real work is making sure the build stays safe after weeks of heavy traffic, passes local inspections, and still feels easy to clean and maintain. Most install headaches do not come from one dramatic mistake. They come from small site realities and rushed sequencing—an uneven slab, lingering construction dust, a missing power point, unclear anchoring positions, or padding and netting finished before the room is truly ready.
In this guide , Koala team will explain what “site ready” actually means, how professional installation teams sequence the work, which checks catch 90% of post-opening issues, and what documentation you should have in your handover package. If you are building a play café or family entertainment venue, you can use the same logic—your goals are the same: safe, durable, and operationally smooth from day one.
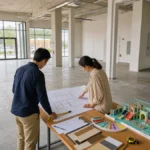
Installation begins before the first bolt is tightened
The installation day is not the start of the project. The start is when you lock the final layout and define responsibilities. Many owners assume the supplier will “handle everything,” but in real builds there are always two parallel tracks: the building fit-out (floor, walls, lighting, HVAC, fire systems, exits) and the playground installation (structure, surfacing interface, padding, netting, signage). When these tracks are not aligned, installation becomes improvisation, which leads to rework.
Before installation, I always insist on a final layout drawing that matches the real room, not an idealised plan. Columns, sprinklers, emergency exits, ceiling height changes, and door swing paths should already be resolved. If you wait until cartons are on the floor to discover a column conflict, the quick fix often creates a narrow bottleneck, weak sightlines, or awkward traffic flow. Those are not temporary issues. They become your daily operations.
If you are still comparing systems and trying to describe what you want, it helps to skim a clear equipment taxonomy first. Check our indoor playground equipment page and talk to Koalaplay Team so you can match the layout drawing with real modules, height ranges, and zone types, instead of guessing from photos.
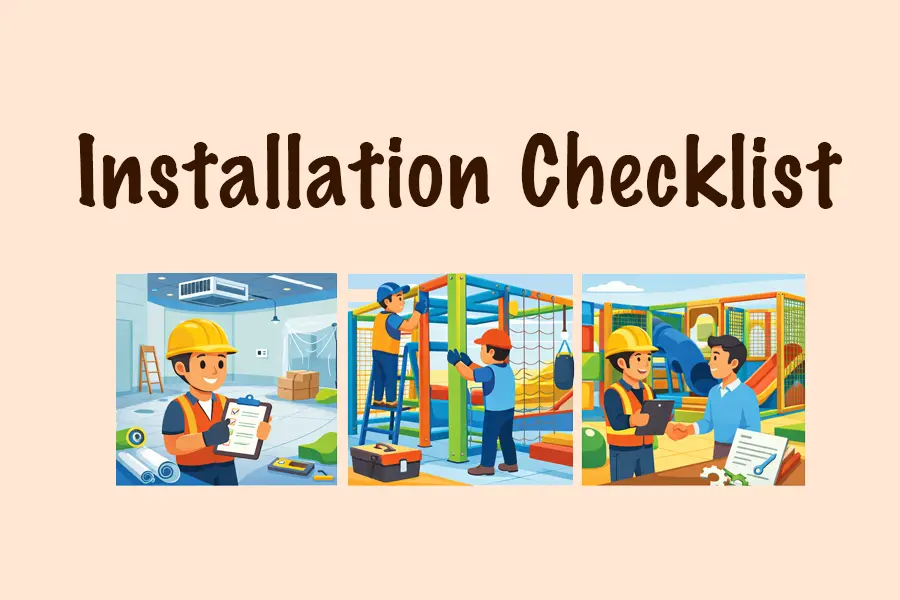
Indoor Playground Installation Safety and Compliance Checklist
Indoor playground standards and local building regulations are two different systems. Standards are usually about equipment safety performance. Local rules are often about building occupancy, fire safety, emergency egress, ventilation, and sometimes materials or surface ratings. Owners do not need to memorise standards language, but owners do need to avoid a common assumption: “We bought compliant equipment, so inspection will be easy.”
During installation, compliance becomes very concrete. Inspectors care about stable and level structures, correct anchoring, protected edges, consistent surfacing in fall zones, and clear emergency routes. Documentation matters because inspections and insurance reviews often need proof. A missing checklist or unclear installation record can delay opening more than a missing part.
I keep the rule simple: when installation is tight and clear, daily maintenance becomes easier. Loose padding seams and poorly aligned netting are not only about looks. They are the start of recurring repair work. If you want a practical owner-side view of how paperwork and safety controls connect, this insurance guide for indoor playgrounds is a useful companion read.
Site Ready Checklist for a Clean Installation
If you want installation to go smoothly, “site ready” needs to be a hard gate. A site can look finished and still be a bad installation environment. The biggest hidden risks are dust and moisture. Construction dust contaminates closures, adhesives, and netting attachment points. Moisture and uncured surfaces can create bonding problems and odours that show up months after opening.
A truly installation-ready site has a finished, dry, and level floor; walls that are painted and cured; HVAC running with stable temperature and humidity; and enough lighting for accurate work. Power points should already be installed where you actually need them. The delivery route must be confirmed. If cartons are carried through narrow doors and stacked randomly, you waste hours and increase the risk of damage.
This is also where owners underestimate time. Even if the playground takes a week to install, you still need time for punch list fixes, deep cleaning, safety checks, and staff training. I treat “installation completed” as a milestone, not the finish line.
I treat this section as the indoor playground installation checklist gate that decides whether the build stays clean or turns messy.
How professional installation teams sequence the playground installation work (and why the sequence matters)
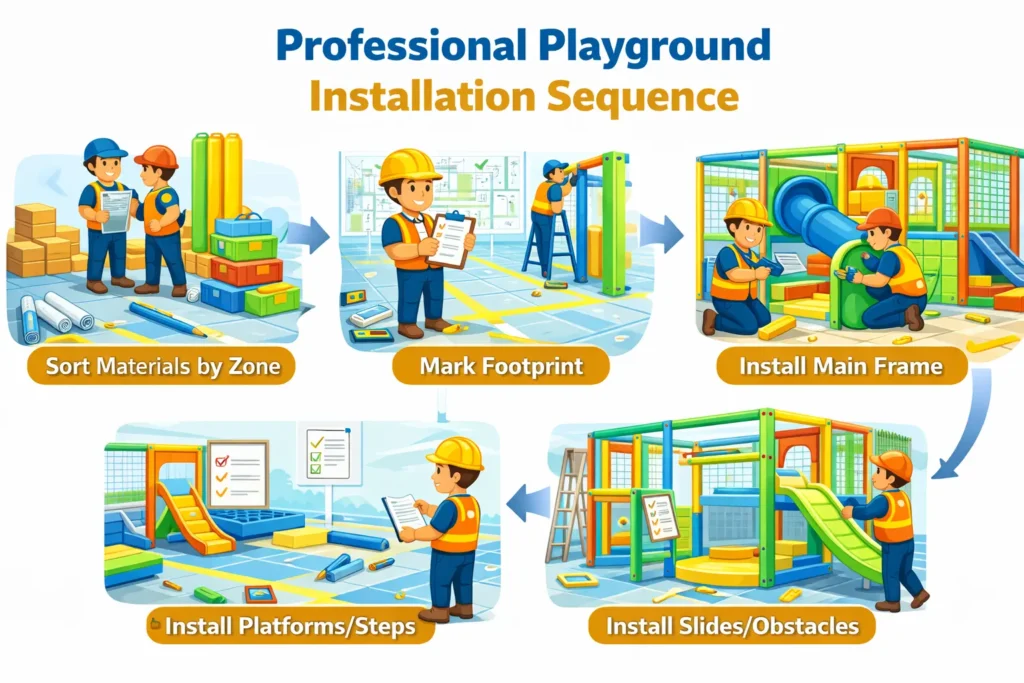
A good installation is not about speed. It is about control. Most professional teams follow a sequencing logic that reduces rework and improves finish quality.
- They begin by verifying the packing list and sorting materials by zone. It sounds basic, but it prevents the most common time sink: building one section halfway, then stopping because a bracket or panel is buried in another pallet. Zone sorting also makes quality checks easier because you can inspect each zone as a unit.
- Next, teams mark the footprint on the floor. This is where the layout becomes real. Footprint marking is not a formality. It is your last chance to catch problems before anchoring begins. If the footprint blocks an emergency path, squeezes a door, or ruins parent sightlines, it is far cheaper to adjust now than after the anchors are set.
- After the footprint is confirmed, the main structural frame goes in. This is where level and plumb matter. Even a small floor slope can cascade into misaligned panels, tension issues in netting, and gaps in padding. Teams that torque everything too early often lock in twist and uneven load. A controlled tightening sequence avoids that.
- Platforms, steps, and internal routes are installed next. This is when supervision lines should be checked in the real space. I like to test visibility before the whole structure is wrapped in padding, because you can spot problems early and adjust openings and barriers while it is still easy.
- Only after the core structure is stable do teams install obstacles, slides, and play panels. Moving elements get checked for smooth travel and pinch risks. Then comes the finish work that determines perceived quality: padding, netting, edge protection, and soft barriers. This stage is where rushed installs turn into “maintenance factories.” If closures are misaligned, seams peel under daily use. If netting tension is inconsistent, kids find weak spots quickly.
- Last comes the detail work at the floor—edges, transitions, and the spots people trip on first. Many early complaints after opening are about transitions curling, gaps showing, or edges lifting near entrances. Those are almost always installation-detail issues.
Flooring and surfacing: the most misunderstood part of installation
Many owners judge flooring by how soft it feels. Inspectors and risk assessors judge flooring by fall-zone performance, consistency, and durability under traffic. Flooring fails when it is treated as decoration rather than an engineered safety layer.
Your installation plan should clearly define what surfacing system is used in each zone and how transitions are finished. Toddler areas, party seating, and mixed-age climbing zones often do not share the same surfacing needs. A common operational mistake is choosing a surface that looks clean in photos but tears or separates under rolling strollers, cleaning carts, and constant foot traffic.
Timing is the other trap. If surfacing is installed too early while other trades are still active, it gets damaged before opening, and you start with repairs. If surfacing is installed too late, it can complicate finishing around posts and edges. The best approach is to coordinate timing with installer requirements so anchoring, edge finishing, and final cleaning all happen cleanly.
If you want a quick view of what a supplier typically supports beyond shipping cartons, you can check how they describe design, documentation, and installation guidance, then compare that scope with what your local contractor can realistically take on.
Installation Checks That Prevent Post-Opening Problems
A high-quality installation is not proven by how it looks on the last day. It is proven by whether it stays tight, clean, and safe after two weeks of real use. That is why the most valuable checks are the ones that predict future issues.
Start with structural stability. A controlled movement check combined with selective re-torque verification catches early loosening points. Then walk the full customer route like a parent and like a child. Adults notice trip points and pinch points differently than children do. Children interact with netting, seams, and corners in ways adults do not expect. If you can, do a crawl-level inspection through toddler-accessible areas. That is where you find the loose seam, the hidden sharp edge, or the spot where crumbs and dust will collect forever.
Next, test fall zones as they will operate, not as they look on the drawing. Many owners add shoe racks, benches, and décor during final styling. If those items end up inside fall zones or narrow the circulation route, you create both safety risk and congestion.
Then do a cleanability test. If staff cannot reach and wipe high-touch areas efficiently, cleaning time grows fast, and hygiene complaints follow. Installation details affect cleaning more than most owners expect. Tight corners, inaccessible cavities, and poorly planned access panels become long-term smell zones.
What Handover Documents You Need After Installation
Handover documents are part of the build. They are not “admin work” you do at the end. A professional handover pack makes it easier to run inspections, manage maintenance, and respond quickly if something wears out.
At minimum, I want an as-built layout, an installation completion checklist, a maintenance and inspection schedule, and a spare parts list. I also want clear guidance on high-wear replacement items such as netting attachment points, padding closures, and moving features. In a commercial venue, parts will wear. The difference is whether replacements are fast and planned, or slow and improvised.
If you are explaining your project partners to investors or landlords, it also helps to show how support works across stages. That is where a simple Who We Are page can be useful as context, because it clarifies roles without turning your installation plan into a sales pitch.
The most common installation mistakes (and how to avoid them)
The first common mistake is starting installation before the site is truly ready. Even one extra day waiting for the floor to fully cure or for dust control can save you weeks of repairs and reputation risk later. A “rushed open” often creates hidden issues that only appear after customers arrive.
The second mistake is treating footprint marking as a formality. If you do not validate circulation, emergency paths, and seating sightlines at footprint stage, you end up fixing problems with barriers and signage later, which rarely solves the real issue.
The third mistake is rushing finishing work. Padding and netting are where customers judge quality because those are what they touch. If seams are loose or edges feel rough, parents lose confidence quickly—even if the structure is technically safe.
The fourth mistake is failing to plan for maintenance access. In a commercial environment, you need to inspect, clean, and replace parts. If installation blocks access to high-wear components, every repair becomes a disruptive job.
The fifth mistake is missing documentation. When you need insurance confirmation, renewal, or incident review, your records matter. A well-run venue can prove inspection routines and maintenance actions. That is operational credibility, not bureaucracy.
How to Install an Indoor Playground for a Play Café
Play cafés add another layer to installation: food, drinks, seating turnover, and parent comfort. Installation should support calm flow. That usually means a clear entry routine, easy-to-understand rules signage, and strong toddler separation so younger kids are protected.
Seating should be tied to installation decisions. If parents cannot see key zones from seating, they stand and move constantly. That increases congestion and staff intervention. Many complaints can be prevented simply by aligning openings and barriers to parent sightlines while the structure is still adjustable.
If you are building an integrated venue rather than a “play-only” space, it helps to read a dedicated Play Café planning page while you finalise layout and zoning. And if you want calmer play that reduces running collisions in café settings, this guide to role play zones and pretend play corners is a practical way to think about traffic flow and behaviour, not just equipment.
How to Run a Soft Opening After Installation
Even after installation sign-off, I plan for a soft opening period. The first one to two weeks reveal the real high-wear points: which seams get pulled most, which corners collect debris, where traffic jams happen, and whether rules signage is understood. This is not failure. It is normal commissioning.
If you document issues early and fix them quickly, you enter your marketing phase with confidence. If you ignore them, small issues become repeated complaints, and your first months get spent on repairs instead of building loyalty.
Closing perspective: installation quality becomes your brand
Parents rarely understand engineering details, but they understand whether a space feels safe, clean, and well-built. Installation is where that feeling is created. The best installation outcomes come from a calm sequence, a ready site, and quality finishing—supported by a handover pack that allows you to maintain the venue like a professional operation.
If you want this article to convert subtly without feeling promotional, keep KoalaPlay mentions factual and supportive: layout guidance, installation documentation, and practical support for overseas projects. That aligns with the reader’s pain points and keeps the content “worth reading.”
FAQ About Indoor Playground Installation
1) How long does it take to install a commercial indoor playground?
Most projects have three time blocks: site preparation, installation, and commissioning. The on-site build for the play structure itself often runs from several days to about two weeks, depending on size, complexity, and how many zones you are installing. What owners underestimate is everything around it—floor curing time, dust control, punch-list fixes, deep cleaning, and staff training. If you want a smoother opening, plan time after “installation completed” for retorque checks, surfacing edge fixes, signage placement, and a short soft opening period to catch real wear points.
2) What does “site ready” actually mean before installers arrive?
A site is “site ready” when installers can work without fighting unfinished construction. In practice, that means the floor is fully finished, dry, level, and cured; walls are painted and cured; HVAC is running with stable temperature and humidity; lighting is bright enough for accurate alignment; and power points are already installed where they are needed. It also means your delivery route is confirmed so cartons do not get dragged through narrow doors and stacked randomly. If you want a simple reference while planning zones and modules, browse the indoor playground equipment categories first, then match the layout to the real equipment types.
3) What are the most common reasons indoor playground installations fail inspection?
Inspection delays usually come from practical issues, not “bad equipment.” Common problems include unclear or incorrect anchoring, structures that are not level or stable, missing edge protection, inconsistent surfacing in fall zones, and circulation routes that interfere with emergency egress. Paperwork also matters more than many owners expect. If you cannot provide basic documentation—such as an as-built layout, completion checklist, and maintenance schedule—some inspectors and insurers will slow the process down. For the owner side of risk control and documentation expectations, this indoor playground insurance guide is helpful.
4) When should flooring and surfacing be installed during the project?
The best timing depends on your floor system and the anchoring method, but the principle is consistent: avoid installing surfacing while other trades are still generating dust and damage risk, and avoid installing so late that edge finishing becomes messy. If surfacing goes down too early, you start your business with torn edges and repairs. If it goes down too late, installers may struggle to finish clean transitions around posts and high-traffic corners. I coordinate surfacing timing with the installer’s sequence so anchoring, edge finishing, and final cleaning happen in a controlled way. If you want a quick view of typical support scope for coordination and guidance, see KoalaPlay’s service process.
5) What should be included in an indoor playground handover package?
A usable handover package should help you operate and maintain the venue without guessing. At minimum, it should include an as-built layout, an installation completion checklist, a maintenance and inspection schedule, and a spare parts list. It should also identify high-wear items you will replace over time, such as padding closures, netting attachment points, and any moving features. This documentation matters for ongoing safety routines, staff training, and insurance renewals. If you need to explain partner roles to landlords or investors, linking to Who We Are can provide simple context without turning your installation plan into sales copy.
Reference
- ASTM International. (2021). ASTM F1918-21: Standard Safety Performance Specification for Soft Contained Play Equipment.
- International Code Council (ICC). (2024). International Building Code (IBC) 2024 — Chapter 10: Means of Egress.
- National Fire Protection Association (NFPA). (n.d.). NFPA 101: Life Safety Code (standard development overview).
- International Code Council (ICC). (2024). IBC 2024 — Section 1006.3.3: Egress (exits / access to exits requirements).
- CEN / BSI. (2017). EN 1176-1: Playground equipment and surfacing — Part 1: General safety requirements and test methods (PDF copy).
- CEN. (2023). EN 1176-1:2017+A1:2023 — General safety requirements for public playground equipment and surfacing (scope summary).
- CEN / BSI. (n.d.). EN 1176-7: Guidance on installation, inspection, maintenance and operation (referenced in standards guide).
- International Code Council (ICC). (2024). IBC Chapter 10: Means of Egress — overview and update notes (secondary summary).